Wednesday, September 30, 2009

dream home?

i love decorating and anything that has to do with the home. but am i in my dream home? nope. far from it.


in fact the home that i just moved from is closer to my dream home stylistically. it was actually a cottage.


so why move into a 1969's multi-level with dark brown cabinets and trim?


here is why. maybe it will also inspire you.


"Then he said to them all: "If anyone would come after me, he must deny himself and take up his cross daily and follow me." "
Luke 9:23 (New International Version)


i have {tried} to embrace this verse in my life. to base all of my decisions and priorities with the idea that i am not my own. i will live in the house God wants me to live in. i will live in the city that God has planned for me to live.


so is a 1969's house in omaha my dream? nope. but i'll make the most of it as i strive to take up my cross and follow the lord.


will you do that too?

Tuesday, September 29, 2009

dining decor

officially fallafied!

i love how my dining room is looking for this autumn season. the browns. oranges. yellows.


i even added some new artwork today. {well, not really new, just new to the dining room}.


that increased my love for my dining room.


then tonight my man hung up my new ikea chandelier. sigh...

Monday, September 28, 2009

the great pumpkin


what a beautiful pumpkin! i plan to carve "trick or treat" on the front of it for halloween night.

marthastewart.com has great pumpkin ideas to copy. check it out! http://www.marthastewart.com/photogallery/pumpkins

DIY: pumpkin topiary


i had seen this idea in bh& g. i think martha does it too. for me, i had all of these things around, so making a pumpkin topiary was free.

supply list:
- urn or pot

- a grapevine wreath that fits into the opening of the urn.

- pumpkins; at least 2

- i used broom corn in between the layers of pumpkins which was free to me from my mom's garden. you could easily use fall picks from hobby lobby (1/2 price this week) or scavenge for fallen leaves


how to:
1.) set the wreath inside of the urn.

2.) start layering pumpkins. make sure they are steady and won't fall over. remove the stems of the pumpkins on the bottom layers for more stability.

3.) use your berries, leaves, etc in between the layers.

inspired? try it yourself. so easy!

DIY: coupons

fyi - this week hobby lobby has a 40% off coupon. if you are looking to do a project, i recommend printing it out and using it!

Sunday, September 27, 2009

plenty of pumpkins!


after a wonderful weekend at my parents' farm in iowa, i have returned to omaha with a large supply of decorative pumpkins and gourds. anyone want some?

Thursday, September 24, 2009

welcome fall

here is my latest copy. so easy! it should look familiar to a previous inspiration post...


supply list:
- a wreath (i owned this, but if you get one half price at hobby lobby i think $5 would be enough).

- ribbon ($2 at hobby lobby)

- first letter of your last name (again, i bought this many years ago, half price, so $5)

- fall picks (again, half price. for 4 picks about $3.)

- floral wire


how to:
- using wire attach letter to center of wreath.

- put your picks into the wreath however you want.

- attach ribbon. seriously SO easy.


cost to me $5. about $15 if you have to buy the wreath. the good thing is that you can change out the picks and ribbon for different seasons.

go ahead, try it!

Wednesday, September 23, 2009

an inspirational blog


love this painting? isn't it inspirational? this was a first anniversary gift from my hubby, painted by my friend leia. she is amazing. she took this picture:

(the copy cat with her tom cat...)


and made it into a beautiful painting.


did i mention she is amazing? painter. decorator. friend.


check out this blog to see more amazing art from my friend leia. http://liquidbirdsong.blogspot.com/


(fyi, in the future i will be doing a post about her lovely cottage...)

bienvenidas

welcome to the copy cat cottage for those of you who are new.


i hope you feel very welcomed.


i hope you feel inspired.


i hope you find some ideas you can copy.


i would love to get to know you! leave a comment introducing yourself, become a follower or just email me so that i know you're out there. nickandstacymackey@hotmail.com

dining dilemma

my dining room table is in need of some fallification.


my dilemma is this. it is our table that we eat supper at every night, so whatever i put as a center piece needs to be easy to move. right now i have a basket on it, which i could easily fill with pumpkins and gourds. i am looking though for something that has a little more candlelight. yet something easy to move.

our table is also large, so i am looking for something proportional.


ideas anyone? something easy i could copy? leave me a comment or email me nickandstacymackey@hotmail.com

Tuesday, September 22, 2009

autumnizing or fall-afying

my friend melissa used the word autumnizing. i love it.

here is my progress so far in my living room.

a simple wooden acorn...


a bright paper pumpkin...


some jars filled with harvest items...


some lovely orange berries...


and voila! fall has come to the copy cat cottage!

DIY: celebration sign


yep. that is me, the copy cat hosting a party. did i mention that is another one of my loves?

there are so many great blogs out there to give you ideas for decorating for baby showers, bridal showers, cute birthday parties, etc. i am a big fan of these blogs. once again, why go to all the trouble to create something completely original? it has probably been done before anyway.

this was an idea i found on one of these party idea blogs. a cute way to make a homemade banner. this party was for my friends' grad school graduation.


the supply list:
- ribbon {usually half price at hobby lobby, $1- $3}

- paper doilies {i used a 40% off coupon, so once again at hobby lobby $1- $3 depending on the size you get}

- scrapbook paper and white card-stock paper {again, wait for the hobby lobby 1/2 price sale. i spent maybe $1 on paper}

- scissors, tape

- letters printed off of your computer


how to:
1.) cut circles from your scrapbook paper. glue this onto the doilies.

2.) cut out your letters printed from your computer. trace them onto card stock. cut those letters out.

3.) glue the letters onto the scrapbook paper circles.

4.) cut slits into the circles so that your ribbon will fit through. don't cut your ribbon until you have all the circles on and know exactly where you are going to hang the banner.


total cost: around $4.

for some amazing party tablescape ideas check out these:

http://amyatlas.com/index.php/main/

&...

http://lifeoftees.wordpress.com/

& don't forget...

http://www.hostessblog.com/

Monday, September 21, 2009

inspired by nature

i would definitely say that my style has a natural side to it.


definitely.


i decided to take the theme of my daughter's bedroom {butterflies & birds} and give it an even more organic feel by adding somethings taken from nature. i wanted to do this to add richness by adding a darker color. to add a different texture. to decorate with something free.


this inspiration came while shopping in the old market area of omaha. i found a mobile hung in a store that used branches, fabric birds and paper. the copy cat in me got excited when i saw it. i could do this. it would be beautiful. it would be cheap.


a challenge. to recreate what i had seen. so i scavenged my yard and picked up some branches. i found some fabric remnants that corresponded with my daughter's room. i used these and a pattern found online to make a fabric bird. to add some sparkle and yet another texture i used some paper butterflies.

mission accomplished.


instead of a mobile, {which i may still do} i put a branch on her shelf.


i used branches as a curtain rod.


i used branches in a flower arrangement. give me enough time {and branches} i am sure i could find more uses...

the copy cat - revisited

for those of you who are new to the blog. welcome. my name is stacy.


i love anything to do with the home - cooking, decorating and sometimes even cleaning. my style is contemporary cottage even though i live in in 1960's suburban home. i love finds at flea markets and garage sales. i love stripes and polka dots. i am inspired by nature. i love green and blue and have no problem decorating my entire house in those colors. i love taking something ugly and making it beautiful. i love having a cozy home where people feel welcomed.

however, i have a confession. when it comes to my home i am completely unoriginal. all of "my ideas" are inspired (aka copied) from various places. pottery barn magazines. design shows. better homes and gardens. my friends. my family. the internet. as a former teacher who lived by the mantra "beg, borrow or steal" i have no problem using other peoples' ideas.

this blog is to give you some ideas that i have copy catted in my home. to encourage you that you don't have to be super creative or original to have a beautiful comfy home.

why take all that energy to create? afterall, there is nothing new under the sun...

Saturday, September 19, 2009

fall and letters!


here is what i described in my letter decor post. i stumbled on this today and i will be doing it for my door soon!

click here to view the blog.

the copy-your-sister cat cottage


another one from the person who inspires me the most.

my sis.


if you haven't yet, you really need to check out her blog. so many great ideas!

pb inspiration


i love this from pottery barn. galvanized tin. so rustic. yet industrial.

the idea i really love in this photo is the use of fall candy. what a great display. trick or treaters. holiday party. or just fall decor.

fall decor ideas from bh&g

here are some ideas that i plan to use from better homes and gardens.


i used these exact tins at my wedding on the end of pews, so i have some lying around my house that i never know what to do with. what i liked about this idea is that it isn't used in a traditional way. it isn't hung on a wall. it is placed in a plate stand. i think i am going to try this with some dried roses that i have.


i liked this idea. seemed like a fun art project. and cheap too. especially if you use things found {for free} in nature. acorns. leaves. pine cones. you could buy different sizes of styrofoam balls to add interest. the only difficulty will be not burning my finger on my hot glue gun. maybe this would be something that i could use all season into january. in bowls. placed on top of candle holders in a grouping. placed on a shelf next to a picture frame.

click here for more ideas!

Friday, September 18, 2009

thinking outside the {color} box...

something i've really been inspired by lately is furniture painted a color other than the traditional colors of white, black or wood.


i love a beautiful blue dresser. a red bench. a green hutch.


here are some pictures of inspiration for me.


my friend liz's baby room dresser


my sister's entry table


here is an example of my painted furniture in my daughter's room. a combo of white and blue.


i also have ambitions of painting my guest/children's bathroom vanity a bright green.


are you inspired to think outside the {color} box?

Thursday, September 17, 2009

things found in glass jars

contentment found on a budget

dear readers,

i hope this blog inspires you.


i hope it spurs you on and encourages you that you can achieve your decorating dreams. on a budget.


wouldn't life be easier if there was no need for budgets? maybe. maybe not.


you see, contentment is not found in what you have or don't have. you can have millions of dollars and not be content. you could have a hundred dollars and be content.


contentment is learned. contentment is a choice. a decision. a discipline.


i encourage you women. don't let yourself go down the path of trying to keep up with the joneses. you will be defeated. instead look at all the blessings around you. focus on what you've been blessed with instead of looking at what you don't have.


i have found joy in making my house a home on a budget. i would encourage you to do the same.


there is joy in knowing that i can achieve the same look as high end magazines by using things i've pulled from dumpsters. who says you have to spend a lot of money to have a beautiful home?


again, the purpose of this blog is to encourage homemakers to not feel overwhelmed but empowered to make their decorating dreams a reality - and still have money in the bank.


once again, you don't have to be original to have a beautiful home. you just need the right resources.

let this blog be a resource.


sincerely,
a fellow copy cat


I know what it is to be in need, and I know what it is to have plenty. I have learned the secret of being content in any and every situation, whether well fed or hungry, whether living in plenty or in want. Philippians 4:12

DIY: growth chart

I have seen various charts that mark your child's growth. on etsy. pbkids.


again, i couldn't afford it.


so i came up with my own version of a growth chart. i think it is the easiest project i have ever done.


supply list:
- a tape measure

- a pencil

- paint (you can use acyclic from hobby lobby)

- a little paint brush

- number stickers (i got mine at archivers for $2.50)


how to:
1.) using the tape measure and pencil mark inches with short lines and feet with long lines. i did mine on my daughter's closet door.

2.) go back with your paint and paint over the pencil lines.

3.) stick your number stickers to the wall. i have not had problems with the numbers falling off. if you are worried about that, i am sure there are things you can do.


in an apartment but want the same look? you can have a home store like lowe's or home depot cut you a piece of wood that you can paint and place on your wall for the same look. you could even use chalkboard paint as the background color and you can chart your child's growth with chalk.


i plan on using stickers or initials for my daughter's height development. maybe i can find butterfly stickers. if i have another daughter, i will use a different type of sticker, like flowers.


see? so easy a caveman could copy it!

Wednesday, September 16, 2009

DIY letter decor: a variation

i am sure this one has been done before, but i feel as if it is an original.

maybe not.

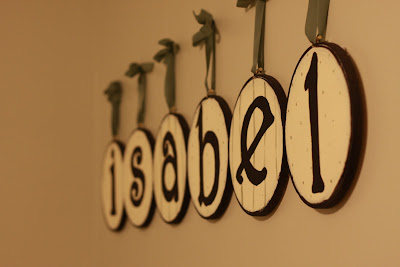
i wanted to spell out my daughter's name above her crib. like most moms i was concerned with it not being too heavy if it fell or something that she could easily grab.

i decided on canvases.

unfortunately when shopping around for canvases (i needed 6) they were out of my price range. i wanted to spend $10 - 15. total. the canvases would cost be $30. minimum.

so i came up with this solution while walking around hobby lobby (very pregnant i might add). i liked that it was different from the usual square canvas i'd seen used.


so, if you want to try, here's how:

supply list:
- cross stitching rings. (89 cents at hobby lobby i believe)
- canvas (maybe $4 a yard.)
- acrylic paint (67 cents and up)
- letters (i printed mine from the computer = free!)
- ribbon (i got mine at michaels for $1)

how to:
1.) you could paint the outside ring first or you can do it after you put the canvas in. your choice.

2.) cut the canvas with some room to spare to fit inside of the ring. stretch the canvas so it fits snugly inside the ring and tighten the screws.

3.) do any painting you want on the circle. i did dots with the end of a paint brush and stripes. i also painted the outside black.


4.) print out the letters you want to put on the canvases. cut out the letters. trace them onto the canvas. (**you could use transfer paper if you don't want to cut, but that is an extra cost.)

5.) paint in the letters

6.) measure out the ribbon so all will hang evenly

7.) tie on the ribbon and hang on the wall. voila!


letter decor

i love using letters as decoration. there is something so simple about it. yet comforting. this is something you will find a lot in pottery barn design.

you will see many examples in future posts where i have used letters or words in my decorating. here is an example of something i did in my laundry room.


supply list:
- letters - hobby lobby has many sizes and fonts. i chose a medium size. normally i think they are $2.47, but i got them half off.

- paint color of choice (you could also decoupage with scrapbook paper). Acrylic paint is anywhere from 67 cents and up.

- brackets and nails to attach to the backs - again, i purchased mine at hobby lobby in the framing department. about $2 per packet.

how to:
1.) i painted mine to look vintage so i was pretty sloppy when painting. i did one coat.

2.) again, to achieve a vintage look i sanded the letters so the natural wood when come through to make them look aged.

3.) measure and attach the hardware on the backs of the letters so that they will hang level on the wall. they are now ready to hang.

here is another example of letter art. from my sis. of course. she used scrapbook paper that goes with her daughter's bedroom colors.


other ideas i've seen for letters. go ahead. copy them!
- i am planning on doing EAT in my kitchen. above the sink. i think. i will do it in large black letters or cut the letters out of paper and decoupage them to plates. i will let you know what i decide.

- on my fireplace i have "m" for my last name. i may move this to a photo collage i am doing in my hallway.

- in the bathroom. "bath". "splish splash".

- in an entryway. your last name with the year your family was established (i.e. smith est. 2002).

- on bookshelves. again, the initial of your last name.

- as a border in a nursery. you could do the abc's all around the room near the ceiling. i would trim this out. it would frame it and make it look nice. i think using different sizes and fonts would keep it fun and whimsical.

- on your front door inside of or on a wreath. again, the initial of your last name.

- christmas time. spell out words of the season. joy. merry. display on photo ledges.

- in a mudroom with lockers. put the initial of the person whose locker it is on the wall above their locker. or above hooks for keys.

where else have you used or seen someone use letters?
fall decor

tis the season of cold pink noses and seeing our breath in the air. of vivid oranges and bright yellows. of hot apple cider and warm pumpkin pie. of harvest and the commencement of the season of rest.

i love the fall.

i was thinking yesterday how i think that trees were made for the fall. all year long they get ready for their big show that lasts only a few weeks in which they display their true beautiful colors.

i love the fall.

i love decorating for the fall.

the first idea comes from my creative sister- in law.

great new ways to display fall bounty.


this one comes from my sister. she made this using an old frame, a glue gun and some dried naturals.


makes me want to head to my parents' farm right now for some indian corn, pumpkins and gourds.

how do you decorate for the season?

DIY: chalkboard tags

i love chalkboard paint. you will notice that i have used it in many projects.

i really like the idea of chalkboard paint tags for baskets. that way you can label what is in the basket. i've seen them in many magazines and stores. here is my version of it.

supplies:
- chalkboard paint (you can buy either a spray can for $5 or a quart for $10. i already owned chalkboard paint which made this project really cheap.)

- wooden squares (i found a pack of 4 at hobby lobby for 99 cents.)

- floral wire (i already owned this, but i think it cost like $1.)

- hot glue gun (prices vary)

- paint (the little bottles of acrylic vary from 67 cents on up

- chalk ($1.25)

how to:
1.) paint the squares. i painted mine white. let dry.

2.) tape off the area around where you want to paint the chalkboard paint.

3.) paint the chalkboard paint inside the square. let dry.

4.) hot glue the wire on the back of the square. let cool.

5.) using the wire, attach square to basket.

6.) after waiting (patiently) 3 days, write with chalk on the square.

if you don't want to use wire you could also use ribbon or twine.

here is how mine turned out:


total cost to me: 99 cents

Tuesday, September 15, 2009

an inspirational blog

in this blog i want to highlight some of the blogs that i get ideas from to copy. this first blog is very special.


it is my sister's.


she has great ideas that you can use or adjust to make them your own. ideas for decorating. throwing parties. cooking.

here is an example of a classic steph homemade project:


very inspirational. check it out! http://everythingthatisnice.blogspot.com/

copy cat commencement

i remember seeing my first pottery barn magazine. it was about five years ago & it was their fall catalog. up until this point i had never seen one of their magazines. i remember opening the magazine and loving every page, feeling as if that magazine was made specifically for me. the style of furniture was the exact style that i loved. cozy. practical. comfortable. the accessories in every room were the accessories that i enjoyed. old globes and books. black & white photography. crisp white dishes. as i thumbed through the magazine i got more & more excited. this was exactly how i wanted my house to look! all i had to do was buy the furniture.


then i saw the price tag.


nope. not gonna be buying it.


i wanted the pottery barn look without the pottery barn price. i started scouring over every magazine of theirs that came in the mail. noticing what was perfectly placed on the shelves and side tables in each room. seeing the layering of blankets on the beds and how that made the bed look so cozy. observing the symmetry found in the wall hangings and furniture placement.


this is when i started my copy catting journey.


i couldn't afford the furniture & accessories, but i could COPY the look without paying the price. i knew this journey would involve searching goodwills and consignment shops for furniture that could be turned into something beautiful. the accessories could be found at flea markets, garage sales and yes, even walmart. i could create the artwork using some canvas and scrapbook paper. my wedding was upcoming & i could register for that crisp white table decor. this could be done.


that was five years ago. one house ago. now i am in a new house and still in love with the pb look. i still squeal with excitement when my husband brings in a new pottery barn magazine from the mailbox. i am still in search for the pottery barn look. it is still me.


i am still a pottery barn copy cat.

Monday, September 14, 2009

inspiration

first step for me in decorating is finding things that inspire me - the ideas that i want to emulate. to stay organized with this i have a binder filled with pictures i've taken from magazines. i call it my dream binder.


another way i am inspired is by keeping my eyes open wherever i am. maybe it is something i see in a store display or a friends house. maybe i am walking through a craft store. maybe i find one item that i love and decide to decorate a room around. maybe while eating supper in a quaint restaurant. inspiration is all around us.


what inspires you? do you have favorite colors? do you have textures you enjoy touching? smells you enjoy smelling? all these things can be a first step in decorating a space you will love & creating a home that is a haven.